Ok, so you want to implement Apple Pay on your website? This article will uncover some pitfalls, tech-details, and gotchas of the implementation. There’s no end-to-end guide on how to implement it as there’s no such thing as a single right way to do this. The article may also help you to make a proper estimation and to communicate with your boss or client why you do need such an amount of time forjust one button.
If you’re wondering about benefits of Apple Pay you can start with the official page. Also there are plenty of articles around the web.
Let’s jet!
# 0 What is Apple Pay?
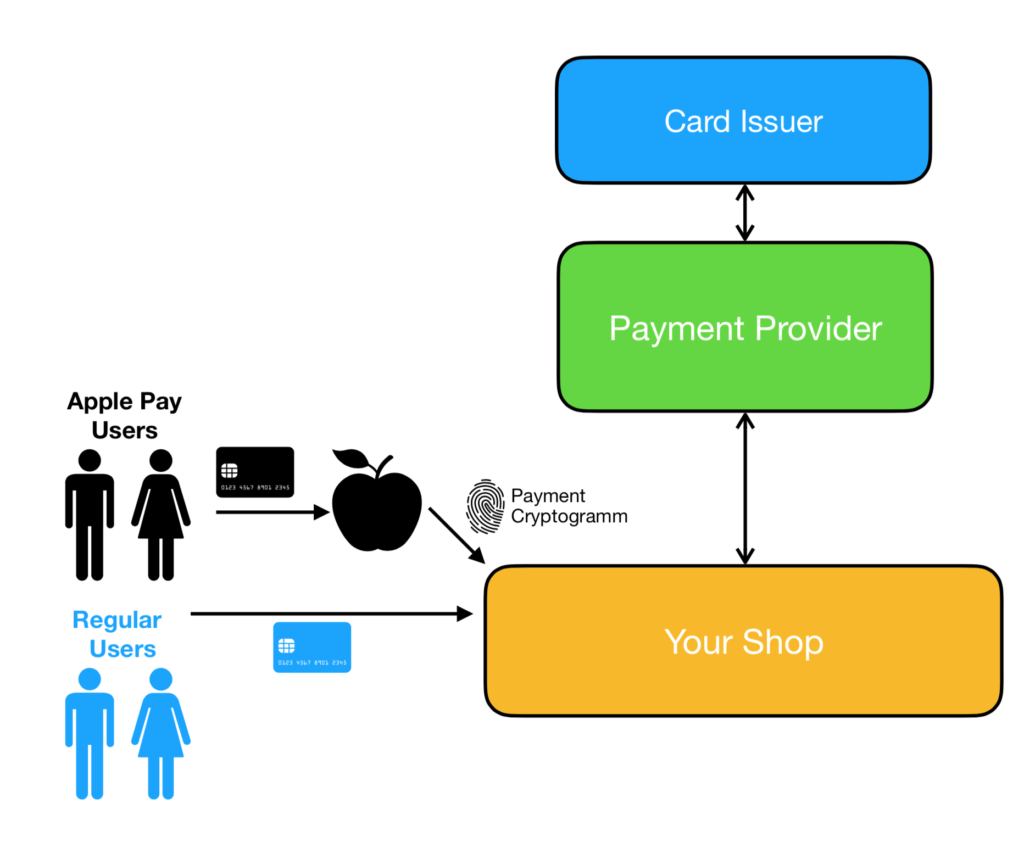
Just to clear things up: Apple Pay is not a payment provider. It’s a medium between the user’s data and your website. This means you still need to process payments in a similar way to any other online payment. Look at the scheme below:
# 1 Choose wisely
Before you start working on Apple Pay there are two things that have to be chosen:
- Frontend API
- Payment Provider
The way you’re going to implement Apple Pay will heavily depend on the choice. Some features you might like to have will depend on the chosen frontend API. But the selection of frontend APIs depends on the payment provider. This is essential.
Let’s take a closer look.
Frontend API
There are two APIs you can use to implement Apple Pay. Apple provides a comparison of both. Here’s a short summary:
Apple Pay JS API. An API provided by Apple in Safari browser. Supported in iOS 10 and later, and macOS 10.12 and later. Features:- Granular error handling. Customizable error messages and field indications; Ability to retry payment after an error while authorization.
- Integration for store cards and co-branded debit/credit cards
- Phonetic names. Basically the ability to show a sign
PAY ${MY STORE}instead of justPAYon the payment sheet.
Apple Pay JS is about better Apple Pay UX and wider OS version range
Payment Request API. W3C standard candidate API. Supported in iOS 11.3 and later, and Safari 11.1 on macOS 10.12 and later. Features:- Cross-browser solution. Once this API is integrated, new payment methods (like Google Pay, Microsoft Pay etc.) can be added fairly easily.
Payment Request API is a good investment in the future as fast-checkout systems are getting more and more support on a variety of platforms
Payment provider
Providers have their own limitations, APIs and frontend components. Some of them don’t even support Apple Pay (the most popular do though). You can check the list provided by Apple. Always refer to provider’s documentation first. It may override some steps defined by Apple. For example
Apple says:
Using an SDK or JS API from a payment provider that supports Apple Pay is highly recommended. The alternative is to provide your own server-side solution to receive payments from your app or website, decrypt payment tokens and interface with the payment provider to process the authorization. Handling credit and debit card payments can be complicated and unless you already have the expertise and systems in place, an Apple Pay SDK or JS API from a payment provider is the quickest and most reliable way to support Apple Pay in your app or website.
There’s one little thing about this statement. Sometimes there’s no alternative. Providers may allow you to implement Apple Pay only via their frontend SDK.
“I already have a payment provider and it supports Apple Pay. I don’t have to choose anything” you would say. Buckle up. Not every provider supports both frontend APIs. Do you like Stripe? I do. But there’s no way to use Apple Pay JS through Stripe’s API. If you don’t have an unlimited amount of time and I’m sure you don’t you may need to make a compromise to deliver the feature on time.
Sounds complicated, right? We’re only beginning.
# 2 Prepare your environment
Now, once you choose the API and the Payment Provider, you can start preparing the dev-environment.
You will need:
- Apple Developer Account.To process Apple Pay transactions you need to receive a Payment Processing certificate which you can get once you enrolled in the developer program.
- A reserved domain confirmed with your Payment Provider or Apple Pay (Refer to your Payment Provider documentation).
- SSL connection to your dev-server. Yes. You did not misread it.If you develop on a remote server it may not be a problem. For those who are not as lucky, there’s a tool called ngrok. It requires a paid account to use custom sub-domains but still may be cheaper than setting up your own servers just for this occasion.
- A device eligible for Apple Pay and a Sandbox Tester Account. Or Xcode’s Simulator.
Is there a way to avoid all of this? Maybe. At least for development. There’s an article by JustEat about Apple Pay on the web written a month after it was launched. The whole article is helpful if you go for Apple Pay JS and custom server-side solution. But there’s one handy thing in it that you’ll love anyway. Guys made anApple Pay JS polyfill for developers to be able to work on Apple Pay on any OS and browser. However, I can’t tell how stable it is. Use it at your own risk.
Now you start to feel the amount of effort. Going further.
# 3 The implementation

The Apple Pay flow is pretty similar to any regular checkout flow. A user selects billing and shipping contacts, shipping method and a credit card to pay with. You add event listeners and update the payment sheet with taxes, duties, fees, discounts or whatever. Sounds pretty simple, right?
Here’s the first pitfall: Apple Pay will provide you with a redacted address until the user approves the payment. You’ll have a country, a state, and a zipcode. For some countries even only a part of the zipcode. It may not fit your address validation logic and you have to live with that. You can implement a zipcode validation or validate the whole address after the payment approval. Also for US (and maybe some other countries) zipcode != taxing jurisdiction. That’s why a proper tax cannot be calculated until the approval as well.
When a user finally authorizes the payment, the backend needs to process it. It will take some time. Not a lot just a few seconds. What can go wrong? Actually a lot of things. Good that we know how to handle promise rejection. And we’re safe for 99% of the time. But it won’t be interesting if you just handle errors and relax. Apple cares about your life to be full of adventures so they put the cancel button on the payment sheet. What’s wrong with it? Nothing. At first. But here’s a tricky part: the button stays on the sheet while you process the payment. Murphy’s law comes here. What can be clicked — will be clicked. How can you handle it? It’s up to you. You can try to revert changes. You can ignore it (not the best idea though). I’m just warning and preparing you.
Also, be ready for the payment provider to send AVS and CVV responses that you usually treat as risky. You can ignore them as Apple uses a tokenization system to encrypt card information and reduce the risk of fraud.
Now you are ready to implement Apple Pay on the web! I hope you’ll find it useful.
Wait, wait, wait, where’s the code? Any examples?
As you probably noticed after reading the first section, the way you’re going to implement Apple Pay may variate a lot based on your choice of Payment Provider and frontend API. I won’t show any examples here, but feel free to check links below or find the ones that’ll work for you.
- Demo Shop by Stripe. Source code is here as well
- Apple Pay JS implementation example by Just Eat.